Butter, Sugar, and a Little Patience: The Creaming Secret Behind Better Muffins
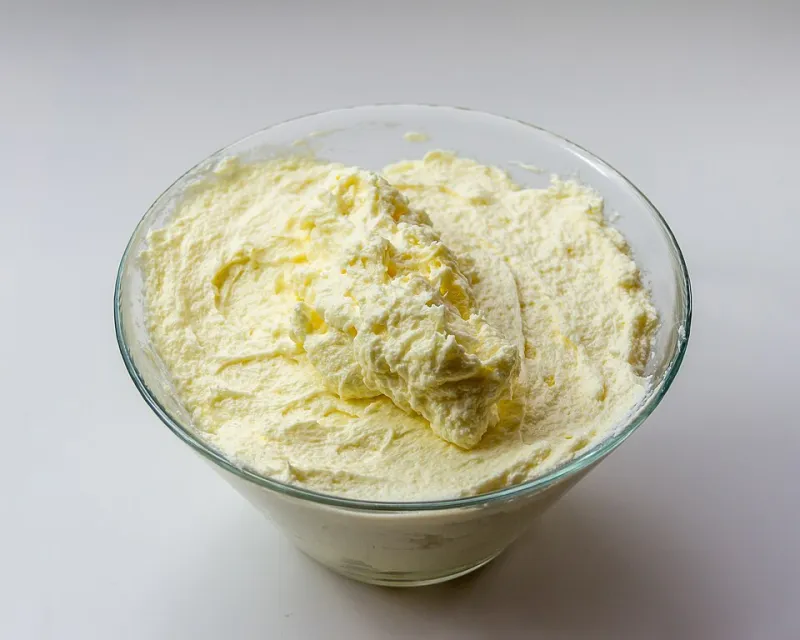
Photo: Raimond Spekking, CC BY-SA 4.0, via Wikimedia Commons
Let's be honest. When a recipe says "cream butter and sugar until light and fluffy," most of us give it about 45 seconds with a hand mixer, declare it close enough, and move on. Life is busy. Muffins are waiting.
But here's the thing — that one step, the one most of us rush through or skip entirely, might be the single biggest reason your muffins come out dense, flat, or just... fine. Not bad. Not great. Just fine.
At Muffin Headland, we're all about helping you understand the why behind the bake. And when it comes to creaming, the why turns out to be pretty fascinating.
What Creaming Actually Does (It's Not Just Mixing)
When you beat softened butter and sugar together, you're not just combining two ingredients. You're building architecture.
Granulated sugar crystals are sharp-edged and abrasive. As they get beaten into soft butter, they physically cut into the fat, creating thousands of tiny air pockets. Those pockets get trapped in the butter matrix, and when your batter hits a hot oven, the air inside them expands. That expansion is a big part of what gives your muffins their rise and their light, open crumb.
Think of it like inflating a bunch of microscopic balloons inside your batter. The more air you incorporate during creaming, the more lift you get during baking — and the more tender the final texture will be.
Skip this step or rush it, and you're starting without those balloons. Your leavening agents (baking powder, baking soda) are doing all the heavy lifting alone, and that's a recipe for a denser, flatter muffin.
The Butter Temperature Problem
Here's where a lot of home bakers quietly go wrong: using butter that's too cold, too warm, or (the classic mistake) melted.
For creaming to work, butter needs to be at room temperature — around 65 to 68°F. At that temperature, it's pliable enough to hold air but firm enough to trap it. Too cold, and the butter won't incorporate the sugar properly; you'll end up with a grainy, clumpy mixture. Too warm, and the butter turns greasy and can't hold structure. Melted butter? That's a completely different technique — great for some recipes, but it bypasses the creaming process entirely.
If you forgot to pull your butter out ahead of time (we've all been there), don't microwave it. Instead, cut it into small cubes and let it sit for 15 to 20 minutes on the counter. You want it to yield slightly when you press it with a finger, but still hold its shape.
How Long Is Long Enough?
This is the question everyone wants answered, and the honest answer is: longer than you think.
For a standard batch of muffins, you're looking at 3 to 5 minutes of beating on medium-high speed with a stand or hand mixer. You'll know you're in the right zone when the mixture turns noticeably lighter in color — from a deep yellow to almost pale ivory — and takes on a fluffy, almost whipped texture. It should roughly double in volume.
If it still looks yellow and dense after a minute, keep going. The color change is your visual cue that enough air has been incorporated.
One helpful trick: scrape down the sides of the bowl halfway through. Butter and sugar have a way of sneaking up the sides and avoiding the beaters entirely. A quick scrape keeps everything in the mix and ensures even aeration.
What Happens to Moisture and Crumb Structure
Beyond lift, creaming also affects how your muffin holds onto moisture — which directly impacts how it tastes the next day.
When fat is properly aerated, it coats the flour proteins more evenly during mixing. This creates a more consistent gluten network, which in turn holds moisture more effectively as the muffin cools. A well-creamed muffin stays tender longer. A poorly creamed one tends to go stale faster and can have that slightly gummy or rubbery texture that's hard to put your finger on but immediately noticeable.
The crumb structure — those little pockets you see when you tear a muffin open — is also a direct result of how much air was built into the fat. More air during creaming means a more open, cake-like crumb. Less air means a tighter, denser bite.
Common Creaming Mistakes (And How to Fix Them)
You're over-mixing after adding the flour. Creaming is about building air. But once flour enters the bowl, you want to mix as little as possible. Over-mixing at that stage develops too much gluten and undoes all your hard work. Fold gently and stop when the streaks of flour just disappear.
You're using cold eggs. After creaming, most recipes have you add eggs one at a time. Cold eggs can cause the butter mixture to curdle and break. Let your eggs come to room temperature alongside your butter.
You're skipping the creaming step because the recipe doesn't seem to need it. Some muffin recipes — especially those using oil instead of butter — genuinely don't require creaming. But if your recipe calls for softened butter and sugar together, that's your signal. Don't improvise.
You're confusing creaming with the muffin method. The classic "muffin method" (wet ingredients stirred into dry) is a totally different technique, typically used for quick-and-rustic muffins. Creaming is the cake-method approach — more effort, more structure, more reward.
When to Use It and When to Skip It
Not every muffin recipe benefits from creaming. If you're making a simple blueberry muffin on a Sunday morning and the recipe calls for melted butter or vegetable oil, you're working with a different method entirely — and that's perfectly fine. Those muffins have their own charm.
But if you want a muffin that's genuinely bakery-worthy — one with a tall dome, a tender crumb, and a texture that holds up beautifully by day two — creaming is worth every extra minute.
At Muffin Headland, we believe the best baking comes from understanding what you're doing and why. Creaming isn't a fussy extra step. It's the foundation. And once you've tasted a muffin made with properly creamed butter and sugar, you'll never rush through it again.